There are 2 orders to sew pointe shoes – sewing elastic then ribbons OR sewing ribbon then elastic. These orders are treated equally, so you can choose one of them to process.
In this article, we will focus on the first order: sewing elastic bands first to shape your shoes, then sewing ribbons for better appearance and fit.
Table of Contents
Things To Prepare
- White or pink cotton thread
- A needle
- Thimble (optional)
- Ribbon
- Elastic
- A pencil
- Sewing pins or safety pins
Check more: 15 Best Pointe Shoe Brands
A Step-by-step Guide To Sewing Pointe Shoe Ribbons & Looped Elastic
Before sewing, you should designate the right and left shoes.
Try on your shoes first to see which shoe fits best for which foot. Then, use a pen to mark the shoe’s bottom with an L or an R to indicate the shoe side.
Step 1. Sew the looped elastic band
1. Mark and cut the band
Use a pen or pencil to mark where you want to cut the elastic band. The band’s length will affect how snug you want it to hold around your foot.
Next, make an angle cut on the marked line so that the band can align well with your ankle’s shape. Then, burn its two ends to prevent it from fraying.
2. Place it right
Place the elastic band 0.5 to 1 inch away from the heel seam. So, it can fit snugly, but not too tight.
Remember that this position is unique to each dancer. You can ask your teacher or guidance if you are unsure about its positioning.
3. Sew it
Sew the band on your shoe’s back by one of the 2 following methods:
- The single-looped method
Use a whipstitch to sew a box around the perimeter and only through the inner side of the shoe. This sewing method will secure the elastic to the shoe, yet still, make the outside of the shoe look clean.
- The criss-cross method
Use the needle to sew 0.5 inches from your pointe shoe’s heel seam. Then place the needle on the other end and sew it diagonally across the side seam.
Depending on your preference, you can sew it 0.5 inches away and behind or before the seam.
4. Finish
Repeat the 3 above steps on the other shoe to have a matching pair.
You’ll love: 15 Best Ballet Books for Adult & Toddler Dancers
Step 2. Sew the tied-ribbon
1. Cut the ribbon
A ribbon often comes pre-cut at 6 feet long. You should cut it in half for each shoe. Next, cut each piece in half again. So, you will end up having a total of 4 even ribbon strands, with two for each shoe.
Then, use a lighter to graze the ribbon to make it hard. Kid dancers should have an adult do this step.
2. Place it right
Place the ribbons at the highest point of your feet’s arch. Since each foot can be different, you should use a pen or pencil to mark this point inside each shoe.
You can use safety pins to mark the ribbon’s position.
3. Fold it
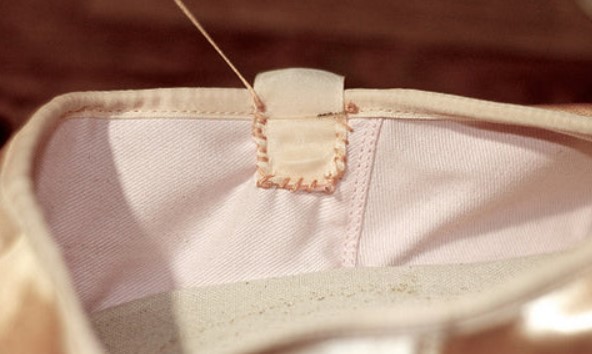
Secure a ribbon by folding it over a 0.5-inch square from its end (or approximately the size of your thumb). This folding square will keep the ribbon from fraying and make the attachment tighter.
4. Navigate the square pattern
Place the square in the middle of the shoe’s inner with no extra or baggy material. You can wear the shoe to detect your placement. If you are unsure, consult a pointe shoe fitter/ your teacher for guidance.
5. Sew it
Use a whipstitch to sew around the ribbon square’s perimeter, or sew through the inner shoe’s lining. This method will keep the shoe’s outside look clean.
Similar to elastic bands, you can choose either the single-loop method or the criss-cross method.
6. Make a loop
Create a loop and pull the thread through the loop to make one or two secure knot(s).
7. Finish
Cut the thread’s end with scissors. Then, repeat the above sewing step with the remaining shoe.
Sewing Guide for Loop Ribbons
If you don’t like to tie the ribbon, you can sew ribbons in a loop.
1. Measure it
Unlike the tied-ribbon sewing method, you should wear the shoes first, then place a ribbon on a shoe to measure its length.
The ribbon should be placed near the elastic band to hug your foot’s arch. Wrap the ribbon tightly on your ankle twice.
2. Cut it
Hold your finger on the ribbon and trim the ribbon with scissors. Repeat this process with the remaining shoe.
3. Sew it
Attach the ribbons to your shoes with a needle and thread as you should do with a pre-cut ribbon in the above section.
Once you’ve attached your elastic and ribbons, your pointe shoes are now secure and ready to go.
Some Notices When Choosing The Sewing Supplies
Choosing the thread
You need a needle with an 18-inch (or 46cm) piece of thread for a sewing round. The needle should be strong enough to penetrate the thick material or the shoes.
Insert the thread’s end through the small eye of your needle. Then tie a knot at the end of the thread to keep it neat when sewing through elastic and ribbon.
Plus, you should choose a thread color that is well-blended with your elastic and your shoes.
Choosing the elastic band
It’s not recommended and not easy to sew elastic bands on the dancer’s shoe heel, especially for beginners. If you sew it too tight, it can harm the soft skin around your ankle.
If you plan to sew an elastic band on your shoes, you should choose one with dimensions of 0.5 inches wide and 0.91 m long. It should be the same color as your pointe shoes. Plus, it should be soft on your skin if you want to wear shoes with no stock.
You can sew the band on the inside or outside of the shoe depending on your comfort or your teacher’s preference. You should carefully measure the band’s length to make a firm hold on your feet with little tension.
Choosing the ribbon
You should get a ribbon with dimensions of 1 inch wide and 1.8m long. Similarly, it should have the same color and material as your pointe shoes. For example, shoes with a satin finish should match with a satin finish ribbon.
Tips On Sewing Pointe Shoes
- You can sew your ribbons closer to the inner shoe with a slight angle toward your shoe’s front for more secure placement. Elastic can be sewn further down the shoe or close to the ribbons depending on your personal preference.
- Use a needle threader if you can’t get the thick thread/floss through your needle.
- Buy several rolls of elastic and ribbon to share with your friends and save your money.
- You can reuse the ribbons from your old pointe shoes several times. Yet, never reuse your old elastic bands since they have lost their elasticity and support.
- Use a thimble if you aren’t familiar with sewing through your shoes.
- To make a more secure attachment, wrap the ribbon to create a square, then sew a box around this square and do an “x” in the middle of it. This ribbon square should look like a small box with an “x” in the middle.
- Always carry a sewing kit with a needle, thread/floss, scissors, and thimble in your dance bag for emergency repairs.
Final Words
Knowing how to sew pointe shoes is a critical skill for ballet dancers of all ages and skills. But first, you should choose pointe shoes that fit snugly with your feet.
If you need extra support on shoe-fitting or sewing elastic and ribbon onto your shoes, you can ask your teacher, guidance, or a pointe shoe fitter.